Even though the Select menu offers several options, there is always room for improvement. Photoshop provides a powerful option for refining an existing selection — the Refine Edge command, which can be accessed in two ways. It is available in the Options bar for all selection tools. You can also access it by choosing Select > Select and Mask.
This command is very intuitive, and its sliders provide quick feedback as you refine a selection. Let’s try it out.
Open your image and make an initial selection using a tool of your choice. Then click the Select and Mask button in the Options bar. A Properties bar will appear to the right side of your workspace, which holds additional controls. And on the left side of your workspace, you’ll see the Refine Edge Tool.

Adjusting your refinement settings
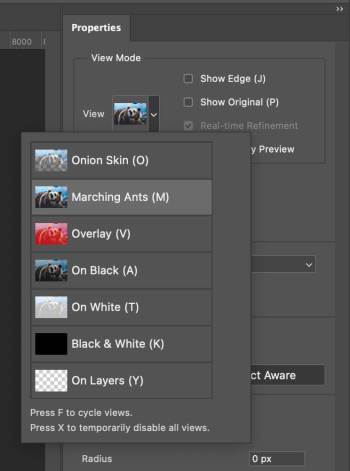
Click the View button to change the viewing mode for how the selection is displayed (or use the corresponding keyboard shortcut). Try the different modes to see the results:
- Onion Skin (O): Preview your selection with the remaining part of your image turned translucent.
- Marching Ants (M): Shows the selection with the started dashed line.
- Overlay (V): Behaves similarly to the Quick Mask mode.
- On Black (A): Previews the layer over black, which is good for light edges.
- On White (T): Shows the selected region over a white background.
- Black & White (K): Simulates a channel view where the selection displays as a black (transparent) and white (opaque) layer (with gray indicating partial transparency).
- On Layers (L): Composites the image over any other layers (or transparency if single-layer image). For this exercise, choose the On Layers option.
Next you can use Edge Detection to clean up the edges further. These controls work best for areas of partial transparency. For this image, try to clean up some of the dark fringe and any of the edges of the hair that should be partially see-through:
- Radius: Drag to refine the selection edge. Try a value of 8 for this image.
- Smart Radius: This option automatically evaluates contrast in the edges and attempts to correct for better transitions.
If your object lacks uniform hardness and softness, use this option. Select this option for this image (and in most cases).
The next group of sliders allows you to adjust the edge globally. Experiment with the following sliders:
- Smooth: Removes any jagged edges.
- Feather: Softens the edge of the selection.
- Contrast: Increases the contrast of a selection’s edge. You’ll get better results in most cases with the Smart Radius and refinement tools.
- Shift Edge: Grows or shrinks a selection. This is a quick way to tighten a rough selection and remove color spill.
Using the Refine Edge Brush Tool

Once you have your settings dialed in, go to the Refine Edge Tool on the left side of your workspace. Here you can use the Refine Edge Brush Tool (R) to brush over specific areas that might need refinement. You can dial in brush settings in the Options bar at the top of your screen.
In Properties, you can use Decontaminate Colors to apply color correction. This removes any color spill from the background onto the selected object.
Save your settings, and you’re done!
In Properties, you can also create a preset based on these settings, if you anticipate similar works that need similar adjustments made.
Finally, you’ll need to determine what Photoshop does with the new selection. The choices are many (and useful):
- Selection: Creates an active selection.
- Layer Mask: Creates a nondestructive mask that producestransparency in the highlighted layer.
- New Layer: Creates a new layer with only the selected area.
- New Layer with Layer Mask: Creates a new layer with only the selected area masked. This is the most flexible option. Choose this option for this document.
- New Document: Creates a new document with only the selected area.
- New Document with Layer Mask: Creates a new document with the selected area masked.
Once you’ve chosen your output option, click OK.
Tell your story with the second annual Visual Storytelling Conference!
Experience four days of interactive, online training sessions featuring a range of educational content with experienced photographers and content creators. This free event kicks off with a series of technical boot camps to build essential skills, followed by live, online sessions on photography, video, business and social media. Join live from March 10-13, 2022!
