
ISO allows you to adjust the camera’s sensitivity to light. Let’s help you find out more about ISO.
What is ISO?
ISO is sort of like volume control for listening to music. If there’s not much signal — in this case, light — you crank up your camera’s sensitivity.
Film was rated by ISO, too. However, we can now adjust the camera’s sensitivity whenever we want instead of having to change rolls of film! The higher the ISO number, the more sensitive to light our camera is. An ISO of 100 is not very sensitive. An ISO of 6400 is very sensitive.
When should I change my ISO?
We change ISO based on the scene at hand. Generally speaking, the darker the scene, the more we can consider increasing the ISO. If there is a lot of movement in a dark setting, we may want to make our ISO even higher so we can use a higher shutter speed so moving subjects don’t have as much blur. We can also use a flash to help “freeze” the movement.
What ISO setting should I use?
Generally speaking, you want to use the lowest ISO possible. Why? This will give you the “cleanest” images. This means that there is less “noise” in the images. Some might say that a cleaner image looks less “grainy.” Let’s look at some examples!
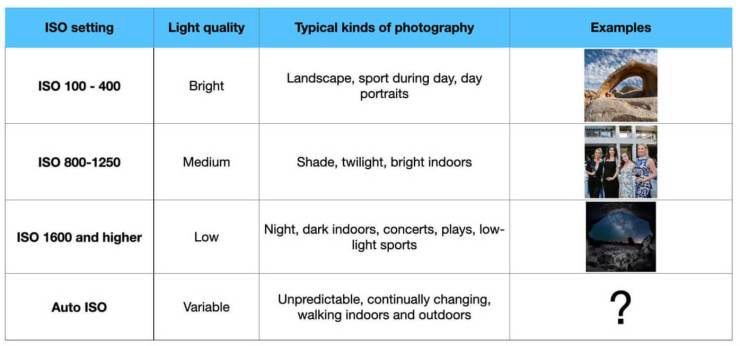
Low ISO settings: It’s bright!
For bright scenes such as day landscape photos, day portraits, or sports during the day, you would typically use a low ISO settings. This might be ISO 100, 200 or 400, depending on the light and shadow and time of day.
Medium ISO settings

For scenes that have less light, such as later in the day, in the shade, or in bright indoors settings, we might raise the ISO to a medium ISO setting, such as around ISO 800 or 1000. As with all settings, adjust this until you get a strong exposure with a lot of information.
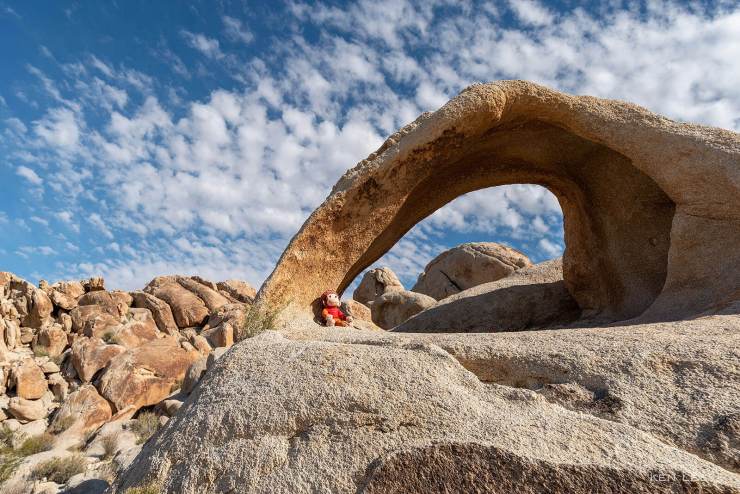
High ISO settings — not too much light right now!
You might use these for very low light settings, such as nighttime, dark indoors, concerts, plays, lower-light sports, and other events. This could be from ISO 1600 and up.
Remember, the higher the ISO, the more noise you might have in your images. However, I’d rather have a noisy image than a blurry image (unless I want blur, of course). Many modern cameras and even phones can take surprisingly clean photos in low light. There’s also software that can help you lower the amount of noise while still retaining detail.

Should I use Auto ISO?
The short answer is “it depends.” Auto ISO allows the camera to choose the best ISO for a particular situation. It makes this decision for you depending on what lens you are using, how much available light there is, and what your shutter speed is. Conveniently, it does this from picture to picture!
There are some scenarios in which you could consider using Auto ISO. I would consider using it if your light is unpredictable and keeps changing, you are constantly wandering in and out, or you are photographing rapidly and don’t want to keep adjusting. A camera’s Auto ISO options are sophisticated and can do a great job of making these decisions for you.
“Real photographers don’t use Auto ISO”
You may occasionally hear someone saying that a “real” photographer will not use Auto ISO on your camera. They say that you should be able to adjust everything manually on your camera. While I am a huge proponent of having photographers understand the exposure triangle (shutter speed, aperture, and ISO and their relationship to each other), I also am a realist. If I encounter the scenarios described above, I just might go ahead and use Auto ISO. If I get great results and it’s easier, then I’m happy.
Of course, there are times in which you might not want to use Auto ISO. Sometimes you might want to set your ISO manually for creative purposes. Or sometimes, you might know better than the camera and want to make the decisions. That’s OK too. This is why it’s good to have an understanding of ISO.
You don’t always have to increase ISO when it’s dark

If you have a tripod and nothing is moving (or you don’t care if it is moving), you can still use a low ISO. You can use a longer shutter speed to make up the difference. If you are using a flash to illuminate the subject, you might not need to increase your ISO as much either.
More tweaky stuff
Every time you double your ISO, you increase the camera’s light sensitivity by a full exposure “stop.” Typically, the full-stop ISO scale progresses like this: 100, 200, 400, 800, 1600, 3200, 6400, 12,800 and so on. See how the numbers keep doubling? The light sensitivity doubles. And so does your brightness. For example, ISO 200 is twice as bright as ISO 100. ISO 400 is twice as bright as ISO 200.
I hope this helps! If you have any questions, please ask below in the comments section.
Tell your story with the second annual Visual Storytelling Conference!
Experience four days of interactive, online training sessions featuring a range of educational content with experienced photographers and content creators. This free event kicks off with a series of technical boot camps to build essential skills, followed by live, online sessions on photography, video, business and social media. Join live from March 10-13, 2022!