With the light changing and Daylight savings ending (or just starting depending on where you live), there has never been a better time to ‘See your light’. Each Season has a different sort of light, have you taken much notice of it before. Summer is more on the yellow spectrum and much brighter, Winter is dull and has more blue in it. It will actually change during the course of a day too. I find Autumn and Spring have the most wonderful light.
So if you struggle to capture great, well-lit still-life images and trust me you’re not alone. It is actually one of the biggest hurdles most photographers face, but it doesn’t have to be. In five easy steps, you can learn how to harness your light for still life photography.
1. See the light
Learn to see your light, really study it. Choose a space where you can place a table by a window and set up a small scene, perhaps a bowl of fruit or a vase of flowers. Then, throughout the day, at one-hour intervals, take a photo of the same setup. Don’t move anything. Put your camera on a tripod for this. Start by setting your camera on ISO 100 and use the Aperture Priority mode and a f/stop of f/5.6 – f/8.
At the end of the day, you will have quite a few images all the same, where light is the only thing that changes. Study the light in each photo. See the shadows and the color of the light. Observe how it changes, especially if your window faces east or west. North and South light will work great too. Different seasons will give slightly different light as well, so it is worth repeating this study at different times of the year, or even in different locations. For the most comprehensive result, do this over 12 hour period.

2. Choose the mood
Once you have studied your light and discovered which one you like best, you can use that light to set the mood for your images. Whether that light is cherry and bright, dark and moody, ethereal or dramatic is up to you. Generally, still life is lit from the side or from behind your subject. Occasionally they are lit from the top with a slight angle for shots made directly above the scene. These are known as lay-flat shots.
3. Natural light or artificial
More often than not most still life photographers use natural light and why not, it’s free. Early morning light and later afternoon/evening light can be the softest and often desirable for photos. In this regard, it’s no different from landscapes. You can set up a table in front of a window and use it as a side or backlight, you can also use a table off to the side of a window for less directional light.
Natural light is not the only light source available. You can still use flash, strobe or continuous lights as well. But you do need to keep in mind your white balance. You can adjust for Flash, Fluorescent or LED on your camera. Generally speaking, you should still only use one light source — we only have one sun and mixed shadows from multiple lights can be distracting in photos, but not always.
Using artificial light can give you the freedom to capture your images at any time of day or night and in any condition. You can try all of the above and set up a simple scene and then move your lights around your scene to get a feel for which direction you find more aesthetically pleasing.
4. Harness your light
The next thing to consider is harnessing your light, you may have window light (or artificial light) but more often than not it is harsh and can cause strong shadows, this is not always desirable. Using something to soften the light is required. A scrim or a diffuser in front of your light source can soften the light. This could be a pro-quality diffuser or simply baking paper taped to a window. You can even use a thin sheer fabric or curtain taped to a window or in the case of artificial light, a softbox, umbrella or sheer curtain taped to a hula hoop. It really doesn’t matter as long as it softens the light.

5. Block and reflect
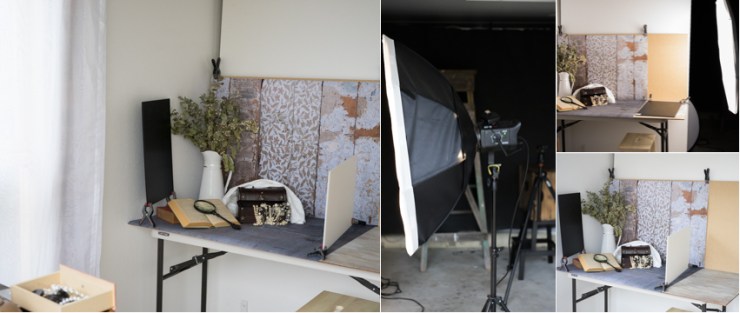
There is one more step to really taking your photography to the next level in regards to lighting it well … blocking and reflecting the light. After using a diffuser to make lovely soft light, it can also create less light. By using a reflector to bounce light back into the shadows, you’ll bring out more detail.
It really isn’t difficult — white cardboard or foam core can work as a brilliant reflector. Angle it toward your light and then tilt it until it bounces some of that light back onto your subject … it does wonders for your still life. If you hold them up with little clamps you can do this hands-free.
Alternatively, you can use something matte black (like foam core or cardboard) to block unwanted light from hitting parts of your scene (like the background) that you may not want. Use your light blockers to drastically cut down the amount of light hitting your scene, and tilt and angle them to create a variety of light slithers to land exactly where you want it to. This can create some truly dramatic images.
This all applies to natural and artificial light. Try it out for yourself and spend a weekend playing with light and really learn the basics, to see and harness the light. It can do wonders for all types of photography, from portraits, landscapes, macro and more.
.mgl-tiles { display: none; } #mgl-gallery-634ecf3b8b514 { margin: -5px; width: calc(100% + 10px); } #mgl-gallery-634ecf3b8b514 .mgl-box { padding: 5px; } @media screen and (max-width: 768px) { #mgl-gallery-634ecf3b8b514 { margin: -5px; width: calc(100% + 10px); } #mgl-gallery-634ecf3b8b514 .mgl-box { padding: 5px; } } @media screen and (max-width: 460px) { #mgl-gallery-634ecf3b8b514 { margin: -5px; width: calc(100% + 10px); } #mgl-gallery-634ecf3b8b514 .mgl-box { padding: 5px; } }


Want to learn more about Capturing beautiful Lighting? Why not check out my self-paced online class — Capturing Light
Tell your story with the second annual Visual Storytelling Conference!
Experience four days of interactive, online training sessions featuring a range of educational content with experienced photographers and content creators. This free event kicks off with a series of technical boot camps to build essential skills, followed by live, online sessions on photography, video, business and social media. Join live from March 10-13, 2022!
