Window light is an easy and affordable option for creating product photos. We may not always have access to lighting or the funds to buy what we need.
A few years ago I wrote a book about one of the new Canon cameras that came out. One of the requirements for this book was to have a product photo of the camera. I always photograph these images myself, and generally, I would turn to studio lights and an elaborate setup to get a nice white background and a well-lit image of the camera.
In between books I have moved three times, my photography subjects have changed quite a bit and I tend to rely more on natural light to get the look I’m after, and so most of my off-camera lighting equipment is packed away. So when realizing I needed to create isolated on-white product photos of the camera, I had to figure something out (and definitely didn’t want to dig up all of my extra lighting gear)!
Using what you know about window light
One of the subjects I tend to photograph the most is food, and I do it all in the comfort of my own home. I don’t have a fancy studio, in fact, in the past several years all of the places I’ve lived in have had similar setups in each of them. Usually somewhere in the living room near a large window. So I decided to use my food photography setup and see if I could make it work with product photography. The good news is that yes, it worked!
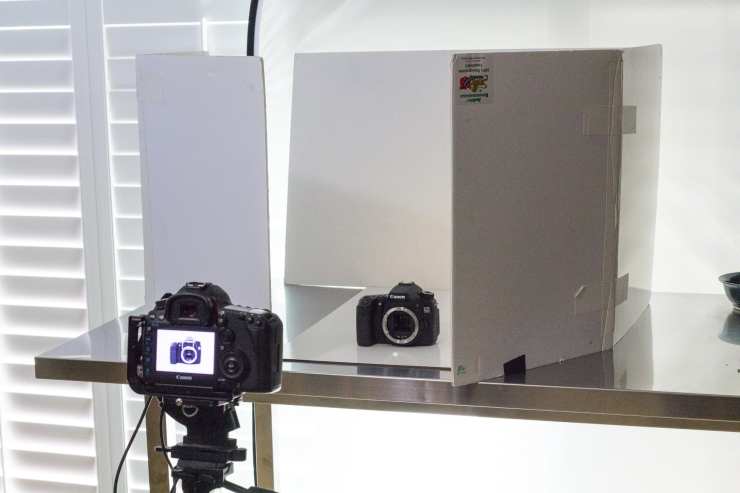
Here is a photograph of my setup I used to photograph the camera at the top of this article.

What I used to create the product image
Tripod
This is a must with this type of work. I photograph with window light at low ISO to keep the noise levels down. This means your exposure can be upward of several seconds, depending on your aperture (a wider aperture would mean a shorter exposure time).
Lots of window light
I have my shooting table set up against a patio window, so the light is really spread out. As you can see for this setup, however, all of my blinds were shut but there was still enough light coming in to light up my scene.
I also have light coming in from other windows in the room. Because my overhead room light uses a daylight-balanced CFL bulb then it did not adversely affect the light for my shot. It actually added a touch of fill light to the scene.
Diffuser
I don’t always have a white foam board up against the backdrop of my setup, but I almost always need to cut out some of the light coming through the window, especially when the blinds are opened. If you have harsh light coming in, then a large diffuser is a good solution to soften that light. The one I have in the background of this setup (and one I highly recommend) is a 4-ft by 6-ft Lastolite Panelight Collapsible Diffuser.
White foam board
Foam board is an excellent tool to use for setups like these. It’s also super cheap! You can pick it up at craft stores for around $1-2 each. I have gobs of it and am always throwing it around my scenes to block light and tame reflections. (BTW, black foam board is also good to have on-hand, just in case you need to cut light from an area instead of reflecting it.)
Whiteboard (under the subject)
For this scene, I used a board I had laying around that had a white reflective surface on it. You can find items like this at home improvement stores (and if you want a large piece, look for tile board; you can get large pieces that are very inexpensive.)
Window light works for many situations
The great thing about the setup I use is that it’s not only good for white background shots. It also works extremely well with other types of product images. This is great if you sell items on a website such as Etsy, eBay or Craigslist.
For this image, I photographed some of my recent wheel-thrown ceramics. Instead of doing it all on a white backdrop, I added some cloth and hand-knit fabric underneath for color and texture.

Tell your story with the second annual Visual Storytelling Conference!
Experience four days of interactive, online training sessions featuring a range of educational content with experienced photographers and content creators. This free event kicks off with a series of technical boot camps to build essential skills, followed by live, online sessions on photography, video, business and social media. Join live from March 10-13, 2022!
