Using an on-camera flash at an indoor event is probably the simplest way to make pictures of small groups look their best. At weddings, parties and fundraisers, friends and families are together for a short time and they are surprisingly willing to be in a photograph. It’s best to use a speedlight, not your camera’s pop-up flash, but the speedlight alone will probably give you faces that are too bright, backgrounds that are too dark, and light that is too harsh.
There are lots of camera settings listed below, but if you’ll do the following it’ll make your event pictures more natural and flattering. Just follow the directions one at a time.
Note: These steps are best applied if your speedlight is designed to work with your camera brand specifically. If you have a Nikon, a Nikon Speedlight will work this way, or a Canon Speedlite on a Canon camera, etc. However, other brands like Godox, Phottix, YongNuo, Nissin and Neewer also make speedlights that will communicate with your camera. When you buy a flash, make sure it says it works with your camera brand’s TTL. I’m using a Lumix flash with my Lumix GX8 in the pictures below.
Camera settings
Aperture
Set the camera to Manual mode and choose an aperture that will give you an adequate depth of field for small groups. Remember, depth of field is also related to the lens length you use. 50mm on a full-frame camera is wide enough to get several people in a picture, and you might use as wide as 35mm; just be careful not to go too wide or you’ll be distorting the subjects more than they will appreciate.
A zoom lens works fine, and most will give you f/5.6. If you feel f/5.6 isn’t enough depth of field, then stop down to f/8. But remember, f/8 lets half as much light come into the lens (more on this below). In the example pictures, I’m using a 25mm lens on my micro four-thirds Lumix, which is similar to using a 50mm on a full-frame camera, and I’m at f/2.8 which gives a similar depth of field to f/5.6.
ISO
Now, turn up the ISO for four reasons. Higher ISO means less light is needed to illuminate your subjects without changing aperture or shutter speed. When you double the ISO:
- Your flash will need to output half as much light, which means you won’t be bombing your subjects with a mega bright flash and they are less likely to blink
- Your batteries will last twice as long and the flash will recycle to the necessary output twice as quickly
- You can use a smaller aperture, like f/8, without making the flash brighter
- You can double the shutter speed and keep the same brightness, which means sharper pictures
Recycle time is how long it takes your flash to be ready for the next shot, and shortening that time is a big deal at an event. It’s also great to not have to change batteries. All this comes from increasing the ISO.
If you increase the ISO from 200 to 400, you’ve cut in half the power needed from the flash. Go up to 800, and you’ve cut it again to a quarter of how much is needed at 200. Any camera from the last few years makes a fine picture at ISO 800. Since you’ve already chosen the right aperture, all you need now is the right shutter speed.
.mgl-tiles { display: none; } #mgl-gallery-634ee3ef457e5 { margin: -5px; width: calc(100% + 10px); } #mgl-gallery-634ee3ef457e5 .mgl-box { padding: 5px; } @media screen and (max-width: 768px) { #mgl-gallery-634ee3ef457e5 { margin: -5px; width: calc(100% + 10px); } #mgl-gallery-634ee3ef457e5 .mgl-box { padding: 5px; } } @media screen and (max-width: 460px) { #mgl-gallery-634ee3ef457e5 { margin: -5px; width: calc(100% + 10px); } #mgl-gallery-634ee3ef457e5 .mgl-box { padding: 5px; } }
Without flash.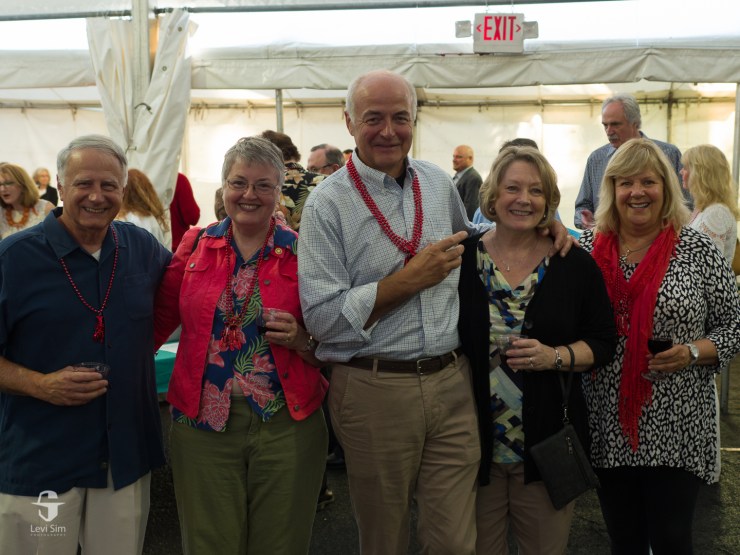
With flash.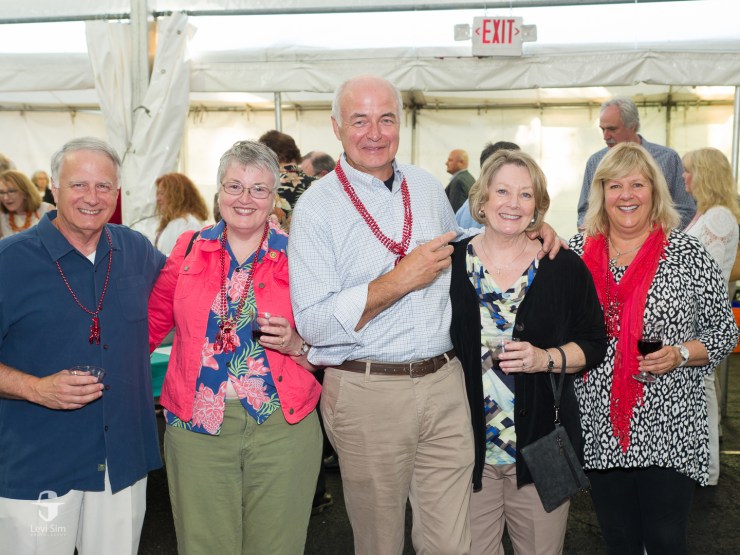
Shutter speed
When using a flash on the camera, shutter speed’s main job is to adjust the brightness of the background. You can go as fast as your camera’s X-sync speed (here’s an article about that, and you can look it up in your manual), or you can go as slow as you need to make the ambient light look good.
Even if the shutter speed needs to be slower than you’d usually use to get a sharp picture, you’ll be OK because the flash is fast and it will freeze your subjects.
At an indoor event in the evening, I usually use about 1/30s. For these pictures in late afternoon inside a white tent, I used about 1/100s. Here’s an example of one that was shot with a faster shutter speed and you can see how much darker the background is.
.mgl-tiles { display: none; } #mgl-gallery-634ee3ef460f8 { margin: -5px; width: calc(100% + 10px); } #mgl-gallery-634ee3ef460f8 .mgl-box { padding: 5px; } @media screen and (max-width: 768px) { #mgl-gallery-634ee3ef460f8 { margin: -5px; width: calc(100% + 10px); } #mgl-gallery-634ee3ef460f8 .mgl-box { padding: 5px; } } @media screen and (max-width: 460px) { #mgl-gallery-634ee3ef460f8 { margin: -5px; width: calc(100% + 10px); } #mgl-gallery-634ee3ef460f8 .mgl-box { padding: 5px; } }
1/250 of a second makes the background too dark.
Slowing to 1/80th of a second brightens the background and makes a better picture.
Second Curtain or Rear Sync
Now go into the camera menu and find your flash settings. You’re looking for something that says First or Front and then Curtain or Sync. Switch this to Second Curtain or Rear Sync. This will help you get sharper pictures with a flash even when using a slow shutter speed. Here’s an article that goes more in-depth on this topic, and includes some fun techniques.
Flash settings
Mount your flash to your camera, turn it on, and choose TTL, iTTL, eTTL, or whatever the balanced fill-flash setting is for your flash. TTL means the flash will use the camera’s metering system to adjust the amount of light it outputs. The flash looks “Through The Lens” (TTL) to adjust the light output.
Next, be sure to adjust the exposure compensation for the flash (+/- button) and set it to -2/3. This makes the flash less bright than it thinks it should be. The trouble is that the camera and the flash both think a perfect exposure should be gray, but they can’t tell the difference between a picture that is too dark and a picture with people wearing black. It sees the color black, or dark blue or dark anything and thinks the picture is too dark, so it brightens the flash and the faces end up washed out.
Start with the exposure compensation set to -2/3 and adjust it up or down (brighter or darker) to look good after you make a few practice shots. Remember, the flash is only lighting the people upfront; if the background is too dark, adjust the shutter speed and/or ISO.
Bounce and color
If you point your speedlight dead ahead, you’ll blind your subjects and cause shiny spots on their faces because the speedlight is a very small and hard light and it’ll reflect that back directly to the camera. Also, all the shadows will be cast directly away from the camera and that makes people look heavier and sometimes unrecognizable.
For more depth and more flattering pictures, you need to make the light larger and less direct which will soften it. You’ve probably heard about bouncing it off the ceiling, which is a good technique. However, the ceiling height often changes, and the distance to your subjects changes, which means you have to pay attention to the angle of the flash for every shot. In the example pictures, the ceiling in the tent went from eight feet to twenty feet, and bouncing off it just wasn’t reliable.
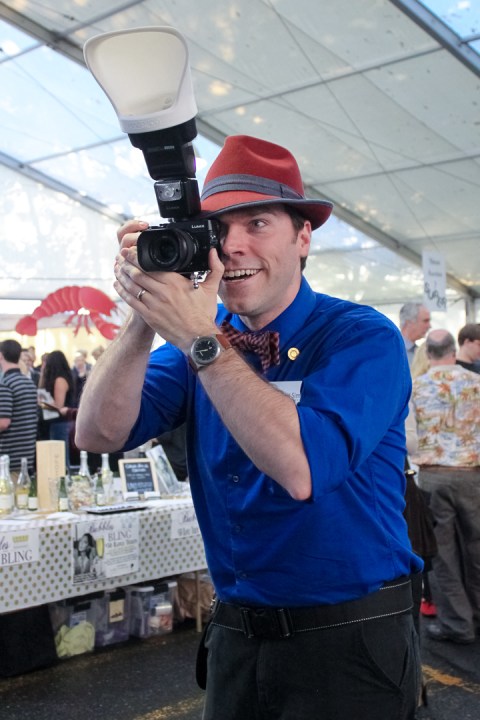
Instead, use a tool on the flash to bounce light forward and make it softer. There are dozens of such tools on the market, but my two favorites are the MagMod tools and the Rogue FlashBender. You can see Magmod’s MagBounce on my camera. These tools catch the light from the flash and throw it forward in a larger spread than the bare flash which makes it softer. They also raise the light above the eyes of most people, which means there will be some shadow cast downward giving more dimension to their faces. Another great thing is that the FlashBender and the MagBounce give you bounced light even if you’re shooting outside with no roof overhead.
You may find that the color of the flash doesn’t match the ambient light in the room where you’re shooting. Light from the speedlight is very white, and most venues have warm incandescent lights which are very orange in comparison. You can add a gel to make your flash match those lights, probably a CTO gel. Adding a gel darkens the flash, though, so you’ll need to adjust the flash compensation a little brighter. I love the Magmod system because adding color with gels is so simple. Just take off the MagBounce and snap the gel holder in place. In the examples, the ambient light was daylight, so I didn’t need a gel.
Timing
Even though you’ve reduced the power output of the flash, people still often blink. Take one picture, check it quickly, and if they blinked, take another but this time shoot it on the count of two instead of three which may surprise them just enough to catch their eyes open.
.mgl-tiles { display: none; } #mgl-gallery-634ee3ef46840 { margin: -5px; width: calc(100% + 10px); } #mgl-gallery-634ee3ef46840 .mgl-box { padding: 5px; } @media screen and (max-width: 768px) { #mgl-gallery-634ee3ef46840 { margin: -5px; width: calc(100% + 10px); } #mgl-gallery-634ee3ef46840 .mgl-box { padding: 5px; } } @media screen and (max-width: 460px) { #mgl-gallery-634ee3ef46840 { margin: -5px; width: calc(100% + 10px); } #mgl-gallery-634ee3ef46840 .mgl-box { padding: 5px; } }
People blink. It happens.
Try shooting on the count of two; your subject expects the count of three and you’ll catch her with her eyes open if you shoot early.
If alcohol is being served, try to shoot most small groups earlier in the event. The more people drink, the more their eyes are likely to appear closed in pictures. On the other hand, they may also loosen up and be more willing to be photographed.
One more thing
Summertime has lots of events for you to practice these techniques. The camera and flash settings above will get you started making great pictures with a flash mounted to the camera, and the MagBounce will help you make more flattering pictures.
I strongly recommend practicing at things like fundraisers where you can volunteer your services and get lots of experience. However, you need to refine your techniques until they are second nature for you. Volunteering at parties and fundraisers is a good way to provide a service for others and practice for yourself. Please don’t practice at once-in-a-lifetime events, like weddings. You should become as proficient as a professional before you accept professional assignments.
Tell your story with the second annual Visual Storytelling Conference!
Experience four days of interactive, online training sessions featuring a range of educational content with experienced photographers and content creators. This free event kicks off with a series of technical boot camps to build essential skills, followed by live, online sessions on photography, video, business and social media. Join live from March 10-13, 2022!
