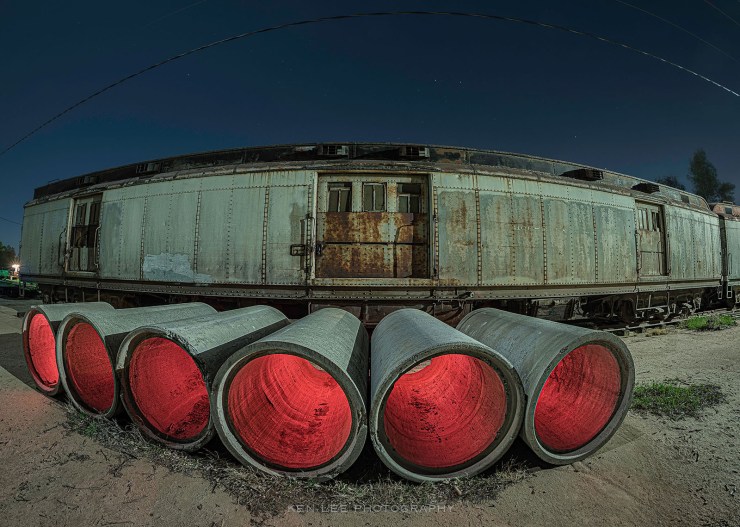
I am really fortunate that I am able to photograph such fascinating subjects. Photographing abandoned trains and locomotives is certainly a highlight.
However, these enormous cement pipes in front of a train car caught my eye. When I aimed my camera with fisheye lens at them, I literally laughed out loud at how silly it looked. I took that as a good sign.
Heavy light pollution
I had a problem, however. There was tons of light pollution in the immediate area. There was one high LED light to camera right. And there were other lights somewhat nearby.
This was how I addressed that, using a handheld light while the camera shutter was open to “light paint,” or illuminate specific areas.

Three easy steps to light painting this scene despite light pollution
1. Switch to Bulb setting
I switched my Nikon D750 camera to the Bulb setting. Why? So I could shorten the amount of time that the shutter was open, minimizing the amount of light from the streetlight relative to my light.
I didn’t want the shutter open any longer than it took for me to “light paint,” or illuminate the scene. This way, when I was finished, I would run back over to the camera and switch it off via my remote shutter release. The camera wouldn’t be open any more than necessary. The total time for the exposure was 56 seconds at f/8 and ISO 200.
2. Light paint quickly
I didn’t want that bright light to blow out the scene, so I ran to some of my locations to illuminate things. I frequently describe night photography with light painting as being an actively creative form of photography. Sometimes, people don’t realize how active it really is!
3. Use light painting for texture and accents
I was not going to use light painting to illuminate the whole scene. The big LED light up high was already doing that for me. I ran to camera right to “skim” some light on the train briefly. This would create texture and shadow on its surface.
Then I illuminated the interiors of all the large cement pipes, moving the handheld ProtoMachines LED2 light in a circular manner quickly. Then, while running back to the camera, I quickly “skimmed” some of the light on the ground to create a little bit of texture without making it look like someone had shined a light there.
LED vs. sodium vapor
More outdoor lights at night use LED lights now. They are a little easier in some respects to deal with when photographing at night. Unlike older sodium vapor lights, they don’t cast this ugly dirty orange glow which often requires quite a bit of attention and color correction if prominent.
With sodium vapor lights, sometimes I work even faster while using a considerably brighter light to cut down on that ugly orange light.
I hope this helps!
Tell your story with the second annual Visual Storytelling Conference!
Experience four days of interactive, online training sessions featuring a range of educational content with experienced photographers and content creators. This free event kicks off with a series of technical boot camps to build essential skills, followed by live, online sessions on photography, video, business and social media. Join live from March 10-13, 2022!
