
A small light source has a tendency to produce hard light which causes unflattering shadows and pin size catchlights in the subject’s eyes. Sometimes when using photographing in direct sunlight at high noon or using small LED lights this can’t be avoided.
Here’s a little trick to make a small light source big to produce a more flattering light with softer shadows and better catchlights in the subject’s eyes.
Make the light source bigger with a diffuser
Like most beginners starting out, I saw the sun at high noon and thought, “Wow, I have lots of great light. I’ll have no problem lighting my subject.”
After shooting an entire roll of film, I was discouraged to see harsh shadows and really small unflattering catchlights in the subject’s eyes once the film was developed. I fixed the problem by photographing my subjects in shade or on an overcast day. Yeah, great fix.
Fast forward to the digital age. Once I got back into photography, I attended lots of classes and asked the right question — how can I photograph a subject at high noon in direct sunlight? An instructor explained to me that the sun is really a small light source, especially during the afternoon. To make it appear bigger, use a circular diffuser. That one little tip made a big difference, but there was more to it. The second tip, move the diffuser closer to the subject. This was the piece I was missing and helped me achieve softer shadows and better catchlights in the subject’s eyes.
Soften the light by moving the diffuser closer to the subject
Just adding a diffuser isn’t enough. Moving the diffuser closer to the subject was the piece I was missing. It made the light source larger, producing a more flattering light with softer shadows and better catchlights in the subject’s eyes. But, how do you determine the correct distance? This is where practicing and experimenting pay off.
The best way to experiment with the correct distance of the diffuser is to set your camera in aperture priority and choose an f/stop. This will allow the camera to do most of the thinking and for you to focus on being creative and the experiment. I like photographing females at f/2.8 and males at f/4 or f/5.6. An aperture of f/2.8 makes skin look smoother because of the shallow depth of field. An aperture between f/4 and f/5.6 still has a nice shallow depth of field, but not so much it makes a male skin look too soft.
Place your subject in direct sunlight against a wall. Have a fellow photographer assist you by holding the diffuser very close to your subject. Take a few shots and then move the diffuser further away. You should notice the closer the diffuser is to the subject the more even the light appears, shadows are softer and the catchlights in the eyes are larger.
.mgl-tiles { display: none; } #mgl-gallery-634ef6dc68454 { margin: -5px; width: calc(100% + 10px); } #mgl-gallery-634ef6dc68454 .mgl-box { padding: 5px; } @media screen and (max-width: 768px) { #mgl-gallery-634ef6dc68454 { margin: -5px; width: calc(100% + 10px); } #mgl-gallery-634ef6dc68454 .mgl-box { padding: 5px; } } @media screen and (max-width: 460px) { #mgl-gallery-634ef6dc68454 { margin: -5px; width: calc(100% + 10px); } #mgl-gallery-634ef6dc68454 .mgl-box { padding: 5px; } }

This same concept makes small studio LED lights appear bigger
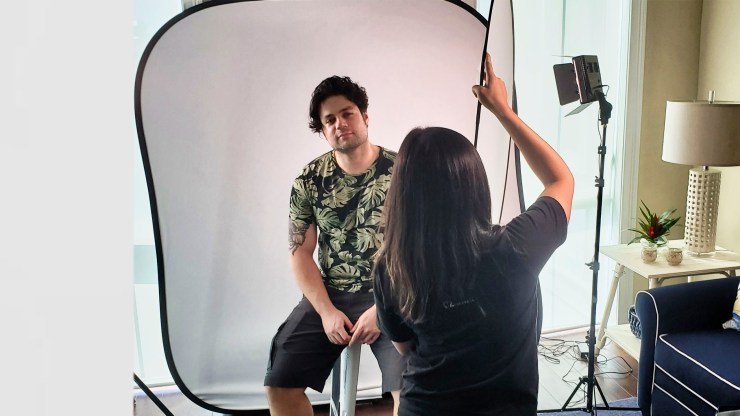
You can make small studio LED lights appear bigger by applying the same concept. Place a diffuser between the LED lights and your subject. I recently did this for a test shoot for a project fellow photographer, Michelle Tricca, is working on. She will be photographing hundreds of people over a weekend for her “The Face of Immokalee” project. She needs all the images to have the same consistent light.
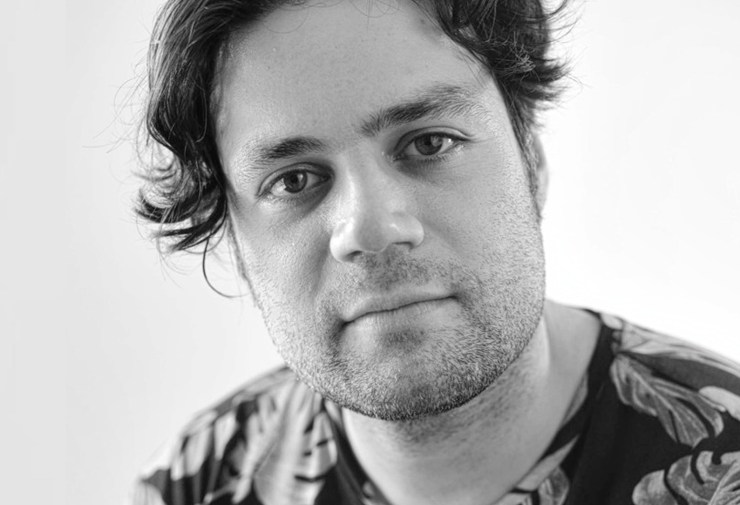
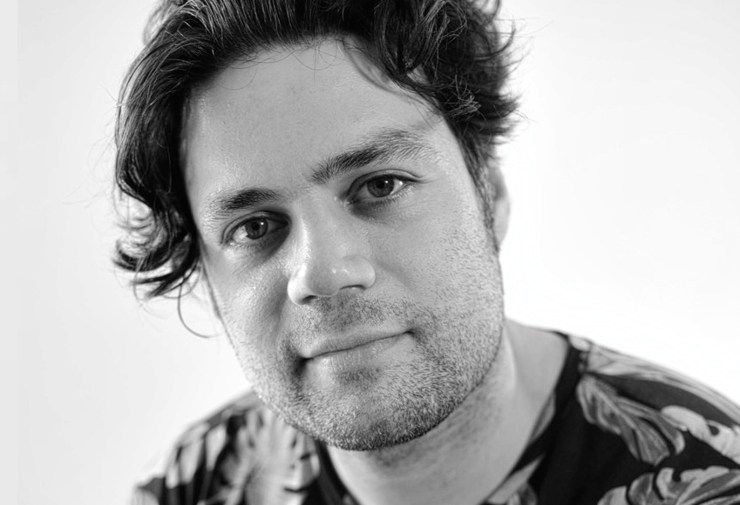
One solution is to use smaller LED lights and add the diffuser. Using this concept, she can set the lights once and not have to worry about them. This allows her to focus on the subjects. She did an experiment with about 11 kids in a very small space. The results came out great! This is a sample shot I took of my assistant Sebas Cardenas. Notice how small the catchlight is on the image without the diffuser.
.mgl-tiles { display: none; } #mgl-gallery-634ef6dc68e0c { margin: -5px; width: calc(100% + 10px); } #mgl-gallery-634ef6dc68e0c .mgl-box { padding: 5px; } @media screen and (max-width: 768px) { #mgl-gallery-634ef6dc68e0c { margin: -5px; width: calc(100% + 10px); } #mgl-gallery-634ef6dc68e0c .mgl-box { padding: 5px; } } @media screen and (max-width: 460px) { #mgl-gallery-634ef6dc68e0c { margin: -5px; width: calc(100% + 10px); } #mgl-gallery-634ef6dc68e0c .mgl-box { padding: 5px; } }
The next time you find yourself faced with a small light source, remember to place a diffuser between the light source and your subject. This way you can produce a more flattering light with softer shadows and better catchlights in the subject’s eyes.
Tell your story with the second annual Visual Storytelling Conference!
Experience four days of interactive, online training sessions featuring a range of educational content with experienced photographers and content creators. This free event kicks off with a series of technical boot camps to build essential skills, followed by live, online sessions on photography, video, business and social media. Join live from March 10-13, 2022!