
When first experimenting with off-camera flash and strobe, one of the biggest challenges can be locating the ideal flash power setting for a given subject and scene.
If the flash setting is too low, the result will likely be flat and underexposed. Too high, and we get an unappealing ‘flashed’ look. When using off-camera flash, there is no one ‘magic’ setting for all circumstances.
While there is no replacement for experience and creative trial-and-error — especially with the immediate visual feedback our digital cameras provide today — using an external light meter to accurately balance light can be a lifesaver when time is of the essence.
What is meant by balanced light?
Balanced Light is a term referring to the proper adjustment of flash/strobe output to sufficiently match that of the surrounding available light. In other words, when we want the artificial light on our subject to appear as if the natural light in the scene is providing that light, then both light sources need to be effectively balanced.

To command a greater creative control in mixed lighting conditions, learning to balance light can help eliminate guesswork and get us to a quality starting point in a more intuitive way. In my experience, this approach allows for a greater confidence with clients in the field and makes for a smoother session all-around — and especially so in rapidly-changing golden hour light.
Invest in a capable light meter
Light meters today come in a variety of sizes, exposure ranges and color sensitivity options. Certain models provide additional frame rate and shutter angle feedback for cinematic uses, but I find these to be unnecessary metrics for the majority of my photography lighting needs.
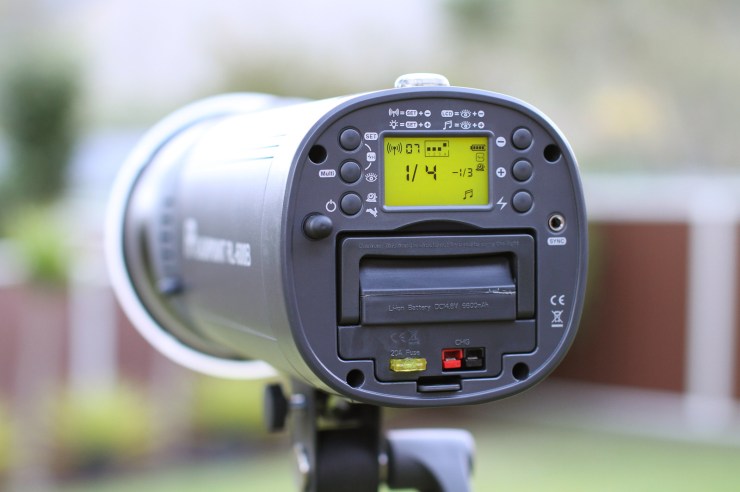
I’ve been using the Sekonic L-308S for years and it goes everywhere my lights go. While this particular unit has since been displaced, I would recommend the upgraded Sekonic L-308X-U model for most photography needs. As to functionality, the short video below will have you up and running in no time.
Invest in a capable strobe and trigger system
The lighting systems used for the images in this article (The Godox AD400Pro monolight head, paired with the Godox R2 trigger unit) are quality, budget-friendly workhorses in the field. While these are units I can confidently recommend, the following steps will apply regardless of the lighting system used.
Now that we have our camera, light(s) and meter in hand, let’s get on with the fun.
Balancing outside ambient and strobe
A quick caveat moving forward — working at a shallow depth-of-field in full sun typically requires the use of High Speed Sync (HSS) flash output, or the use of Neutral Density filters to stop enough light to work within our camera’s native flash sync speed. We’ll dive deeper into HSS portraiture in a future article.
1. Before powering on the light, shoot an ambient exposure to dial-in the background
In full sun or brightly lit scenarios, set the camera shutter speed to match your camera’s flash sync speed, which is typically 1/200s or 1/250s (consult your camera’s manual if unknown) and adjust aperture and ISO to acquire the desired ambient exposure. Disregard the light on our subject for now as our focus here is to expose for the background alone.
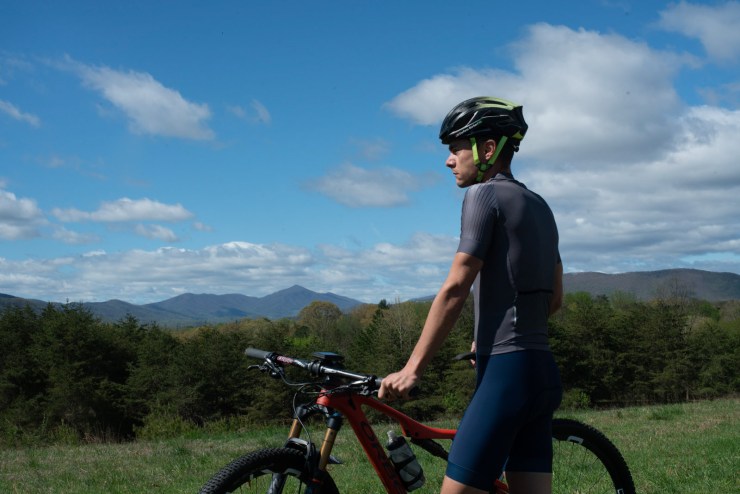
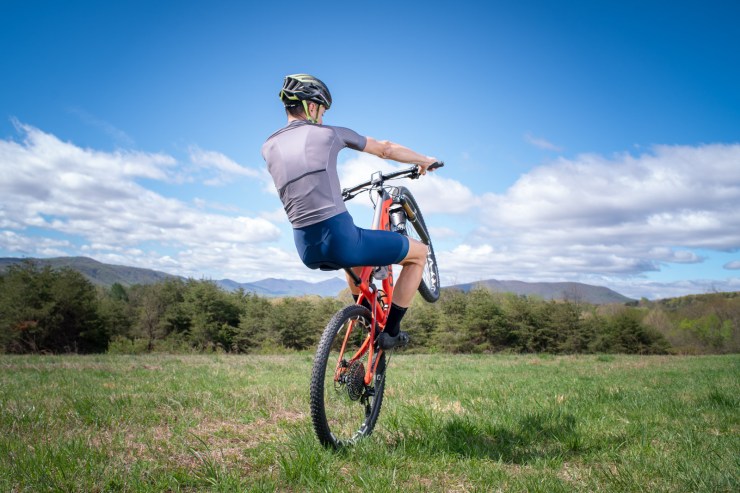
In the above full-sun sample of pro cyclist Stefano Barberi, we located a suitable background exposure using the aforementioned method: shutter speed fixed at 1/250s (the native flash sync for the Sony a7RII body used) at f/16 and ISO 250. Again, there is no emphasis on the subject just yet as our focus here is only on the ambient exposure.
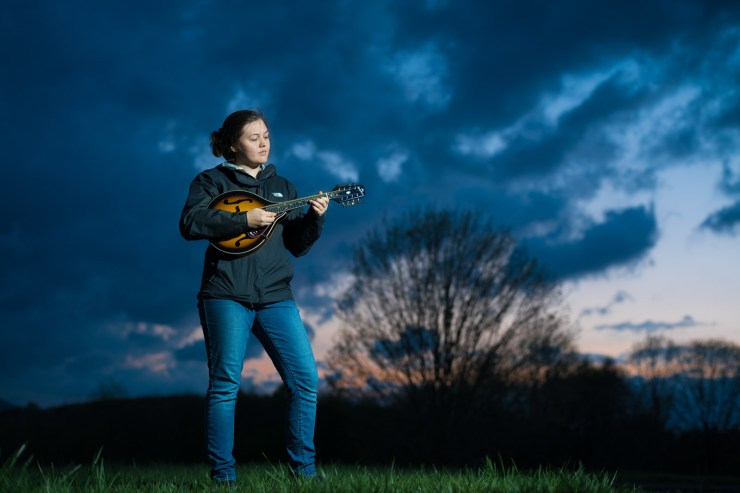
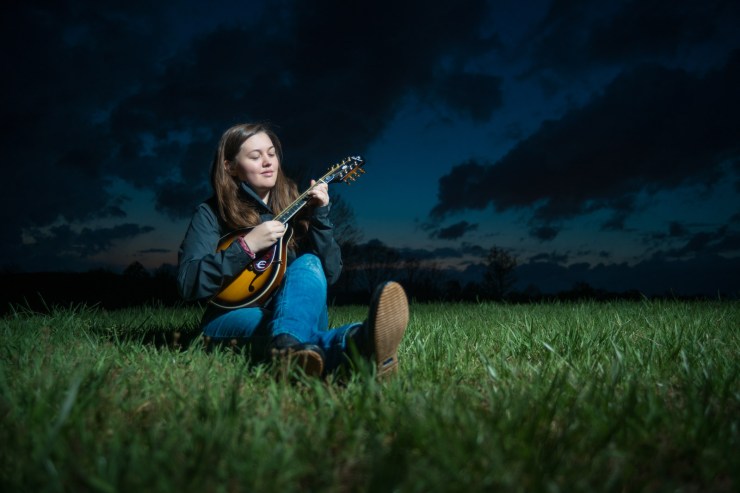
In the above low-light sample, our subject is positioned in a low-ambient twilight setting under a quickly-changing sky. Comparatively, this image required a significantly slower shutter speed of 1/30s to gather enough ambient light at f/8 and ISO 200 to produce the result we were seeking.
It’s important to note when working with off-camera flash that shutter speed controls ambient light and aperture controls flash power. ISO can then be adjusted to feather flash output when the previous two are fixed for creative purposes. While a 1/30s shutter speed would ordinarily run the risk of incorporating camera-shake in this hand-held scenario, it is in fact the flash that freezes the subject regardless of shutter speed — so we’re free to move forward and compose with this in mind.
Now that we have our ambient light settings dialed-in, we’re ready to balance our light and get on with the shoot.
2. Grab the light meter and power on the strobe
Note: If you’re using a Sekonic light meter, refer to the brief video linked above for detailed insight as to acquiring a remotely fired strobe reading.
With our strobe powered ON and meter in hand, it’s time to take a few readings to determine the exact strobe output needed for a balanced result. Since we do not know this figure as of yet, an initial setting of 1/2 strobe power in full sun, and 1/4 power in lower light conditions are good starting points as a rule of thumb.
3. Position your subject and your light as desired
With the meter in flash mode, fire the flash via wireless trigger to take a reading at the desired point of focus and exposure — in most instances, just below the subject’s nose.
Our goal here is to match the strobe output to that of our ambient exposure.
Returning to our full sun example, ensure the meter is set to match our ambient numbers. Start by setting the meter’s shutter speed to 1/250s and the ISO to 250 (or closest available), trigger the flash and take a reading. If the output is over or under our ambient target of f/16, increase and/or decrease the flash power accordingly until f/16 is achieved.
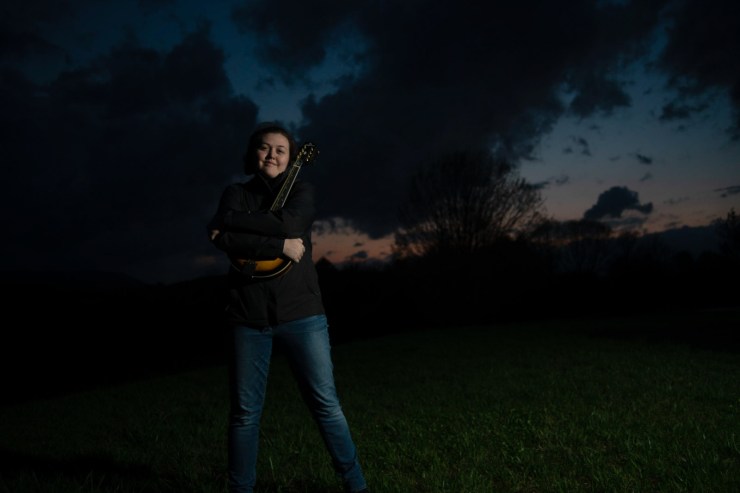
When the meter is reading f/16 flash output, the light is now balanced and we’re ready to start shooting. By starting with a raw ambient exposure, we can successfully meter and dial in a matching key light to set our subject apart with every capture. Light (as metered) can shift and change quickly, so be sure to take occasional readings to stay dialed-in.
Feel free to play with minor adjustments to the ISO and shutter speed to land a variety of creative looks.
As with our full sun example, all that is needed is to grab the meter, take a reading and start balancing our strobe to ambient lighting. In a low light routine, the only difference is to start with a lower output setting, say around 1/4 to 1/8 power, but no worries — the meter will tell us precisely what we need.
Confidently balance mixed lighting
The lasting benefit of working with a light meter and off-camera lighting lies in the ability to confidently balance mixed lighting in any scenario. Whether in full sun or low light, with a single light or multiple lights, simply repeat these steps to get the creative train rolling.
- Start with a raw capture (no lighting) to dial-in a desired ambient background exposure
- In full sun, power on flash/strobe and set to 1/2 power
- In low light, power on flash/strobe and set to 1/4 to 1/8 power
- Power on light meter in timed flash (or wireless sync) mode
- Adjust the light meter shutter speed and ISO in accordance with ambient settings
- Position talent and lighting
- Acquire readings and adjust accordingly until the light meter f/stop matches the ambient exposure
- Reacquire readings as needed in varying light conditions
Light is a predictable element, have fun learning to emulate its ways and enjoy making the most of your gear while experimenting with fun and compelling environmental portraiture.
Thanks for visiting, as always. I hope you find the information helpful. Questions? Please leave them in the comments below to assist others on their journey.
Tell your story with the second annual Visual Storytelling Conference!
Experience four days of interactive, online training sessions featuring a range of educational content with experienced photographers and content creators. This free event kicks off with a series of technical boot camps to build essential skills, followed by live, online sessions on photography, video, business and social media. Join live from March 10-13, 2022!