
In part one of this series, I discussed some of the core principles to key on when learning how to use your new camera. In part two, I dive into some deeper settings like focusing modes and white balance while also touching on composition. Finally, I tell you the easiest ways to get that blurred, fuzzy background look that is so popular.
Focusing modes
There are three main focusing modes you can find in every camera — single autofocus, continuous autofocus and manual focus. Depending on what you’re photographing, one of these might be more effective than the other.
Single-shot autofocus (AF-S, S-AF or One-Shot AF)

Think of single-shot autofocus as the default setting for your camera. In this mode, the camera focuses on your subject once (when pressing your shutter button down halfway) and won’t adjust the focus as your subject moves. This is great for things like family portraits, headshots, food, buildings and still life — but isn’t great for any moving targets.
Continuous autofocus (AF-C, C-AF or AI Servo AF)

Unlike single-shot autofocus, continuous autofocus lets you better track moving subjects. When you focus on your subject (by pressing your shutter button down halfway), the camera starts its focusing. It will then recognize movements and refocus to make sure the subject you have targeted remains in-focus. This mode is great for things like kids running around, animals and sports.
Manual focus

This is actually the biggest confusion I hear about from new photographers. Going “manual” does NOT refer to manual autofocus — it instead refers to the manual exposure mode, which I discussed in part one. Manual focus is just that — you have no help focusing on your subject. There are a few instances why you might want to use this.
If you get into shooting advanced video, many videographers shoot solely with manual focus. The other time? When photographing the night sky.
When you’re photographing a completely dark background — obviously present when it’s pitch black outside — your camera can’t find anything to focus on. You might find your lens struggling to find a focus point if you use AF-S or AF-C. When you use manual mode, you can use tools like focus peaking in electronic viewfinders (check your camera’s manual) and focusing your lens to infinity, to make sure you get a sharp photograph.
Other modes
Depending on your camera, you might have some other modes available to you:
- Automatic Autofocus mode (AF-A or AI Focus AF): Your camera will choose to use either AF-S or AF-C depending on the situation.
- Tracking AF: Allows you to lock in on a subject and track it as it moves. Great for photographing fast-moving wildlife, racing or other fast-moving objects.
- Eye AF: Your camera will automatically focus on a subject’s eye, and track the person as they move.
White balance
Most beginners will start our using AWB — or auto white balance. And while this might work great, it’s not the most effective, as it can add to your post-processing time if you edit your photographs.
Your camera has a built-in color meter, much like it does a light meter. For the most part, it senses the color of the environment reasonably well. But the problem is that with each new frame, it re-analyzes your environment. That means that your color can shift frame-to-frame, even by the narrowest of figures.
By selecting a white balance preset like Daylight, Cloudy or Tungsten, you can rest assured that your color will remain the same shot-to-shot. Even if it’s not 100% correct, you can batch process your white balance edits in a program like Lightroom or Luminar so any adjustments you make get applied across your selected photographs.
.mgl-tiles { display: none; } #mgl-gallery-63a06d3c61a72 { margin: -2.5px; width: calc(100% + 5px); } #mgl-gallery-63a06d3c61a72 .mgl-box { padding: 2.5px; } @media screen and (max-width: 768px) { #mgl-gallery-63a06d3c61a72 { margin: -2.5px; width: calc(100% + 5px); } #mgl-gallery-63a06d3c61a72 .mgl-box { padding: 2.5px; } } @media screen and (max-width: 460px) { #mgl-gallery-63a06d3c61a72 { margin: -2.5px; width: calc(100% + 5px); } #mgl-gallery-63a06d3c61a72 .mgl-box { padding: 2.5px; } }
Daylight
Cloudy
Shade
Tungsten
Florescent
For more control, you can set a custom white balance figure. Some cameras allow you to capture the white balance of your environment — which is when a grey card comes in handy. Or you can dial in a custom Kelvin figure. Using a meter that reads color like the Illuminati is a great way to dial in a Kelvin temperature.
White balance might sound a bit confusing, but once you get the hang of it, it’ll become second nature. If you want a deep dive into understanding the Kelvin scale, click here for my complete how-to.
Composition
Starting out, you might be tempted to put your subject smack dab in the middle of the frame. But this usually is not the most effective composition.
You might’ve heard of the phrase “rule of thirds” before. This is a guideline that photographers use for effective placement within a photograph. If you divide your photograph into a 3×3 grid, your subject should be placed along those lines, or at an intersection point.
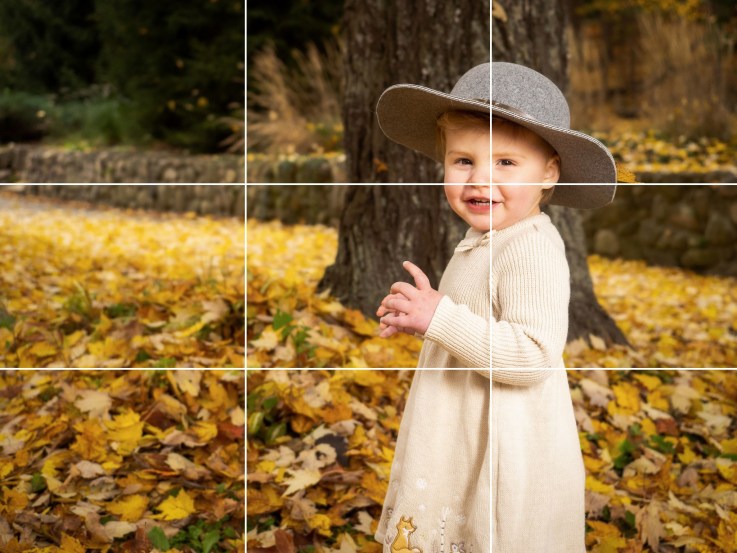
Why is the rule of thirds more effective than placing a subject in the center? Simply, it looks more natural and is typically more pleasing to the eye. It helps to give a sense of balance and space because you’re including some negative space on one side of the person.
All this being said, rules are meant to be broken. Especially with wider architecture shots, I find that I center-frame the point of interest more often than not. But for everything else, rule of thirds is my go-to. If you have a gorgeous landscape with a sunset in the middle of the frame, that might be the most effective composition — especially if you have a prominent foreground element present.

How to get that fuzzy background
While I don’t think this is something you need to understand right away, it’s one of the first questions I get from new photographers. While you could go all out and buy a professional-grade prime lens that will let you get a wide-open aperture, there’s a much easier way.
Move your feet.

You might be thinking, what? Well, it’s really that simple. Get closer to your subject by moving your feet. That will mean the subject will take up more of the frame, and thus take up more of the focal point. If you can’t physically get closer, try zooming-in with your lens.
Oh and that blurry, fuzzy background? That’s called having a shallow depth of field.
Other things you might want to look into
While the above principles can get you started from a technical perspective, there are still several more things you will need to learn and invest time into.
The best thing you can do is find other people in your community to go out with. Decide on a time and place, and snap away with your cameras. You’ll learn from each other. Better yet, if there’s a local meetup group in your area, see if they have any free or cheap photowalks coming up. Cameras can sometimes be intimidating to new users, so being in a social setting can really help you relax and have fun!
Beyond that, I’ve listed a few helpful starter articles on Photofocus that you might want to check out:
- How back button focusing changed my photography
- Shutter Priority and when to use it
- Aperture Priority: What’s it good for?
- Spot Metering: The trick to perfect exposures
- The advantage of Auto ISO
- 5 steps to get out of Auto
There is also a plethora of educational videos on places like YouTube, ThinkTAP Learn, LinkedIn Learning, Viewbug and more. Happy shooting!
Tell your story with the second annual Visual Storytelling Conference!
Experience four days of interactive, online training sessions featuring a range of educational content with experienced photographers and content creators. This free event kicks off with a series of technical boot camps to build essential skills, followed by live, online sessions on photography, video, business and social media. Join live from March 10-13, 2022!