Light painting is a term that is often used loosely to describe any addition of light to a night photograph. Really, though, light painting is a technique that uses a handheld light source to illuminate a scene during a long exposure. You are quite literally painting the scene with light. This is a technique that has been used by night photographers for many decades.
However, it can be used to do more than simply illuminate a scene. It can be used to add drama, emotion, detail, and depth. It’s also bizarrely addicting and strangely fun. In future articles, we will examine different examples of this.
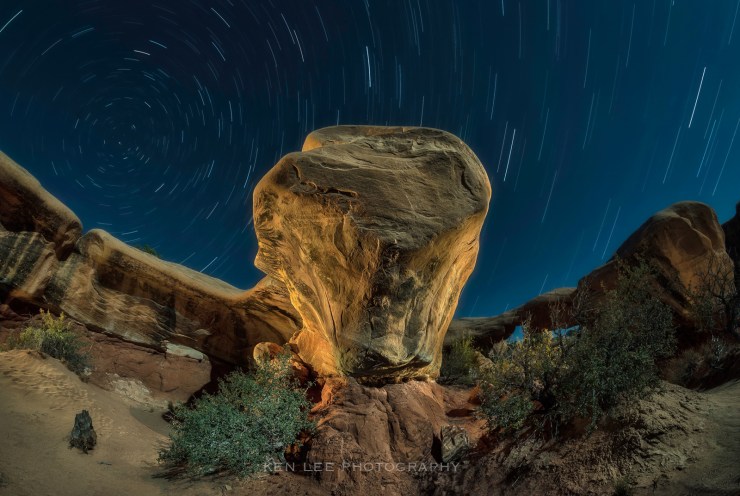
The photo in this article’s example was created in Staircase-Escalante National Monument in Utah. The hoodoos and unusual rocky formations draw many visitors each year.
Angling the lighting

When you observe the lighting, what do you notice? Which areas do you think I was standing in when I was illuminating the large rock formation in the middle? Why did I do so?
If you said that I illuminated the rock from both the right and left sides, you would be right.
Why I chose side lighting for this photo
There are several reasons why I lit the rock from both the right and left sides. To start, since the rock was centered, I felt it would look appealing if the lighting were somewhat symmetrical.
However, there are other reasons. If I light from the side, it creates shadows. And shadows create depth and detail. If you look at the rock again, you’ll notice that the lighting picks up a lot of the details and features.
Side lighting also separates the central rock from the rocks in the back. This makes it pop out more and draws the viewer’s attention to the center first.
Why I never light paint while standing in back of my camera
Light painting from behind the camera illuminates the object straight on. Just like when you use a flash perched atop your camera, illuminating in this manner almost always creates a flat, unflattering, ugly and often harsh light. With light painting during night photos, the result is typically the same.
What I use to light paint
Those of you who have been reading my articles know that I use a ProtoMachines LED2 light painting device. It has a beautiful array of lights and can produce any light in the RGB spectrum. You may control the saturation and brightness, and save your favorite colors to as many as eight settings. However, you may use any decent quality LED flashlight, and if you wish, colored gels and get quality results. Many people use Streamlight or Coast LED flashlights for light painting with exquisite results.
I hope this article gives you some food for thought on approaching light painting, or really, using lighting in general. More than that, I hope it inspires you to go out and try your hand at light painting. Remember, it’s a process, and it frequently takes numerous attempts to achieve the look that you want … even if you know what you’re doing already! Enjoy!
Tell your story with the second annual Visual Storytelling Conference!
Experience four days of interactive, online training sessions featuring a range of educational content with experienced photographers and content creators. This free event kicks off with a series of technical boot camps to build essential skills, followed by live, online sessions on photography, video, business and social media. Join live from March 10-13, 2022!
