The following is an excerpt from Xpozer’s “Photo Editing for the Perfect Wall Print” eBook. Check out their Picture-Perfect Print Pack and get your copy today!
Our passion for photography and producing the ultimate photo enlargements led to the development of Xpozer. But you can only create the ultimate enlargement if the photo you use is already fantastic. Optimization and editing play a significant role in this – for everyone’s photos, including yours!
ou can choose from a number of different software programs to edit your photos. Each program has special functions and filters you can apply when editing. The choice of software is personal; each program has its own advantages. For the sake of convenience, in this section, we will use the most popular program as an example: Adobe Photoshop. Photoshop is currently available through Adobe’s cloud-based subscription service Creative Cloud. You can pay a monthly fee for Adobe Photoshop and Adobe Lightroom. Before subscribing, you can download a free trial version of the software and try out their editing options.
RAW file
If you’re planning to edit your photos, we recommend that you configure your camera so that your photos are saved as RAW files. This file format ensures that the color data of your photos is always available and that you can make modifications to your edits later on. Photoshop opens RAW files in a popup window called Camera Raw. The popup offers you specific options that are useful when optimizing photos. When you open your RAW photo in the Camera Raw popup, Photoshop immediately generates an XMP file. This file contains all the edits you made in Camera Raw. The next time you open your RAW file, all these edits are loaded automatically. It is very useful if you want to modify a photo edit at a later time.
Tip for editing layers
Are you a fan of the tools Camera Raw offers? You can access them in this window via the Photoshop menu bar > Filter > Camera Raw Filter to use this powerful tool on a layer.
Lens Correction fixes flaws
You may not see lens flaws straight away on your computer screen, but when you enlarge your photo any lens flaws will also be magnified. So fix them now! It’s important to invest in a good lens. However, no lens is perfect. Thankfully, you can correct many lens flaws with good editing. This is important because big prints reveal flaws too small to be seen on a screen,
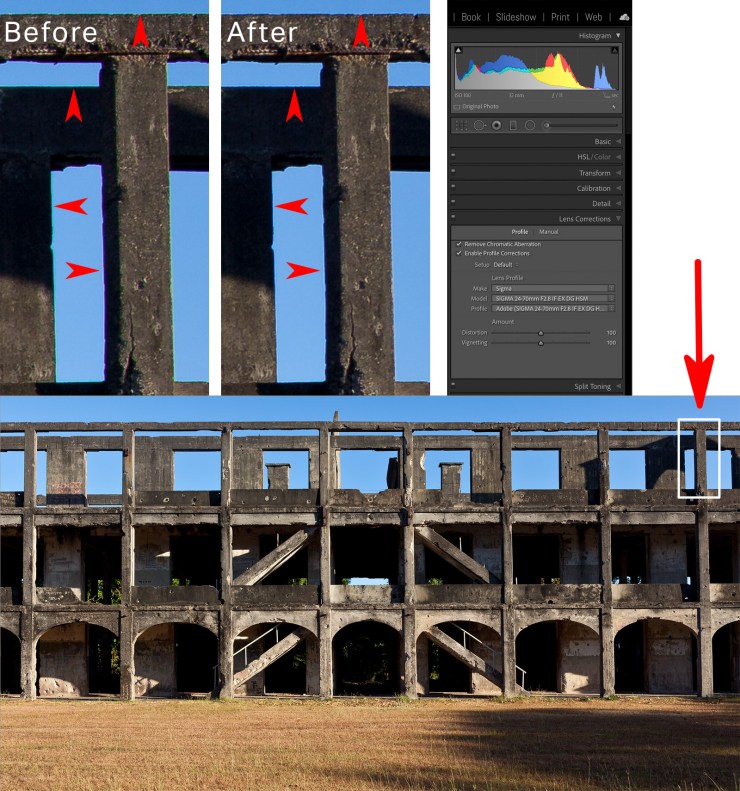
Chromatic Aberration
A green or magenta fringe along the edges of images with a light background, often along the branches of trees or the sides of buildings against a sky. This is caused by the lens not being able to focus all of the colors at the same point on the camera sensor. Lightroom has two checkboxes that fix not only chromatic aberration but also distortion. They are in the Develop module in the Lens Corrections pane.

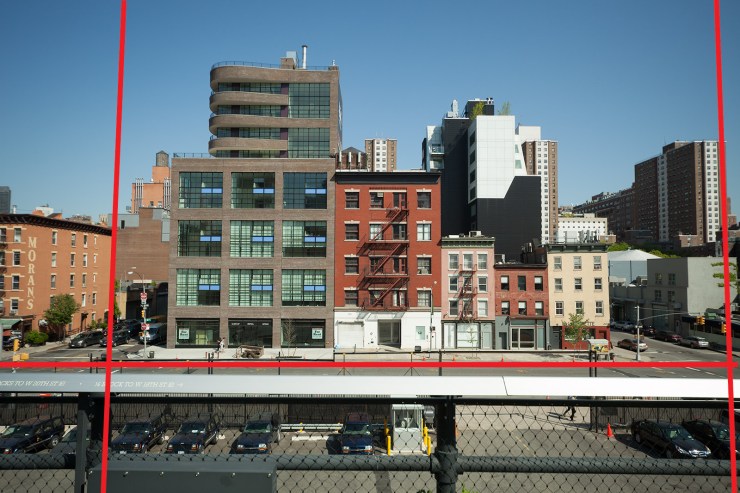
Perspective distortion
Buildings at the edge of a frame can look like they are leaning. They also lean into the photo when the camera is tilted up. The red lines show the perspective distortion in the buildings and that they aren’t quite level. These issues might be OK for the screen but they become very obvious in an enlargement.


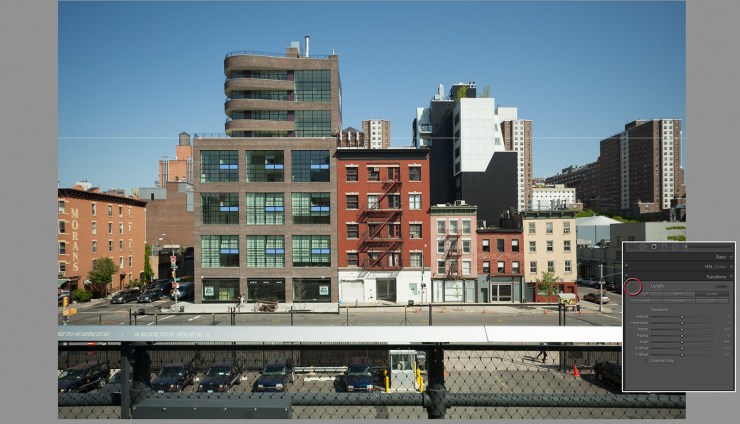
Horizon straight?
Check that your horizon is straight. If the horizon is not straight when you display your enlargement the effect will be unsettling as if the photo is hanging crooked. Of course, you can easily prevent this by using the Transform tool in Lighroom’s Develop module in the Transform pane. Simply click Level and Lightroom and Photoshop will immediately straighten the horizon. Tip: These tools are in Photoshop’s Camera Raw filter.

Tell your story with the second annual Visual Storytelling Conference!
Experience four days of interactive, online training sessions featuring a range of educational content with experienced photographers and content creators. This free event kicks off with a series of technical boot camps to build essential skills, followed by live, online sessions on photography, video, business and social media. Join live from March 10-13, 2022!
