This Exposure Tactics post explains what a “technically proper” exposure is and how to get there. Remember I said technically proper, not creatively right.
The three photos above are with different exposures. Each one brings out a different feeling or aesthetic. Which one is correct? I want to answer that with another question: Which one do you like?
Since I made the photos, I can share that the one on the far left is the “correct” exposure as read by my light meter. The middle photo is 2 f/stops overexposed and the one on the right is 2 f/stops underexposed.
The sensors in our cameras don’t necessarily match the sensitivity of our light meter. Sad and true. This can make it difficult to judge exposure and get things right.
One meter from Sekonic, the L-858D-U (B&H | Amazon) as can the Illuminati IM-150 can be calibrated by shooting test targets to match it to the exposure characteristics and dynamic range of up to three different cameras. Most other meters can be adjusted to compensate for the exposure differences of an individual sensor. Even with a calibrated camera/meter combination, the exposure might not be completely perfect.
Getting exposure right
Exposure is the amount of light that renders the true tone of the subject in a photograph. A proper exposure provides detail in both highlights and shadows. There are thresholds for both.
Neither of them shows up in the clipping warnings on the camera’s monitor in a histogram or in Lightroom Classic and or Photoshop. They are determined by the output device — monitor or iPad for the web and the inkjet printer or printing press in the case of paper photographs. If an exposure includes detail in both the highlights and shadows there is plenty of room for creative post-production.
Measuring tonal values
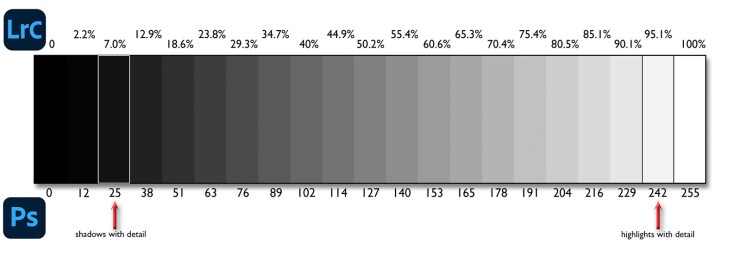
Here’s a 21-step grayscale. Black represented by 0 is on the far left and white (255 in Photoshop or 100% in Lightroom) is on the right.

- Lightroom’s values are percentages from 0% to 100% while Photoshop’s numbers range from 0–255
- Middle gray is 50.2% in Lightroom Classic
- It is 127 in Photoshop
The more important values are shadows with detail and highlights with detail. Shadows below 7.0% in Lightroom Classic or 25 in Photoshop will have no detail. On the highlight side of things, values above 95.1% in Lightroom or 242–248 in Photoshop will be lost.
Why Lightroom uses one system and Photoshop uses a different one is a story of JPEG, RAW and human perception.
Bit depth
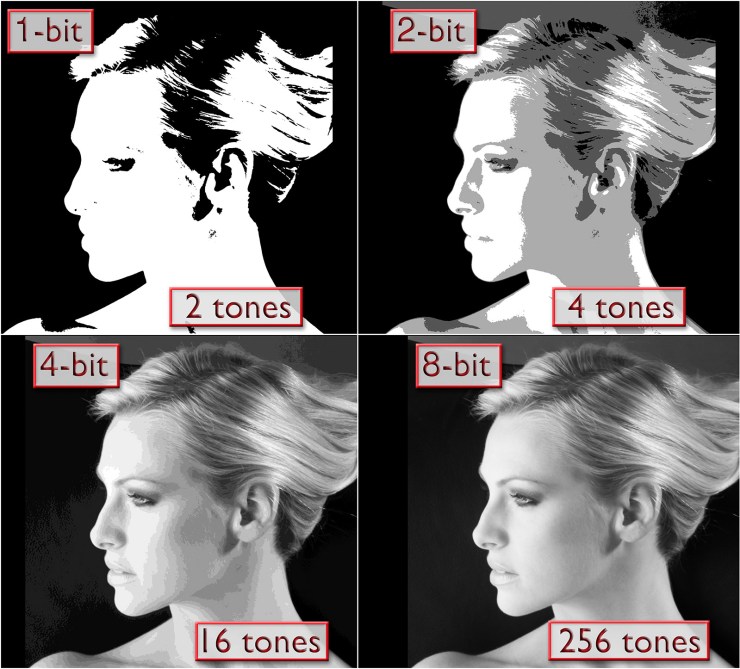
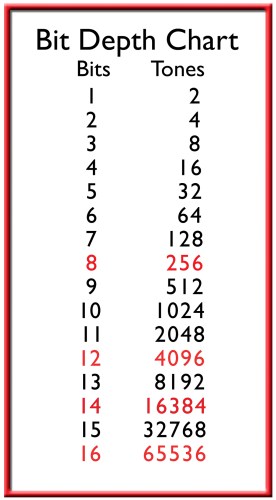
Bit depth is the number of tones a pixel shows. The higher the bit depth, the greater the number of tones. Bit depth is exponential, meaning the number of tones double for every increase in depth. 1-bit is black and white. 2-bits is black, white and two tones of gray. 4-bits is 14 gray shades plus black and white. An 8-bit file has 254 tones plus black and white. Our eyes can’t see the difference in the steps in an 8-bit file. Any file, 8-bits or higher, is a continuous tone.

- The first digital cameras a quarter of a century ago were, for the most part anyway, 8-bit.
- Since then, bit depth has risen. 14 and even 16-bit capture cameras are available today.
- Most DSLRs today shoot in 14-bit.
- High end medium format backs can record 16-bits.
- A 16-bit photograph has a huge number of tones.
A big jump in quality

Compare the 256 tones in a JPEG image to a 14-bit capture with 16,000 plus shades or a 16-bit file with over 65,000. Cameras that capture in high bit depth but are set to save JPEGs can discard up to 63/64s of the data shot.
High bit depth is a reason for the tonal value scale in Lightroom being shown as percentages. Photoshop’s scale (0–256) is one increment per tone in 8 bit. Twenty-five years ago that made sense. This scale was adopted and is still Photoshop’s number system for pixels and when working in Camera Raw.
In 16 bit, there are 256 tones between each number in Photoshop. Lightroom’s scale represents higher bit depth with more accuracy than Photoshop’s. (In Lightroom Classic’s Develop module, the Photoshop scale of numbers can be seen under the Histogram by clicking the Soft Proof check box.)
The joy of 16-Bit RAW
16-bit RAW files offer amazing flexibility for post processing. Everything, even a “proper” exposure, has to have a starting place. What better beginning point than one where there is detail in the highlights and shadows?
To achieve a “proper” exposure start with color corrected photo. How is covered in a previous Exposure Tactics post. Since most RAW data is in the brightest f/stop of an exposure, highlights are the basis for refining exposure in Lightroom and Camera Raw.
Tell your story with the second annual Visual Storytelling Conference!
Experience four days of interactive, online training sessions featuring a range of educational content with experienced photographers and content creators. This free event kicks off with a series of technical boot camps to build essential skills, followed by live, online sessions on photography, video, business and social media. Join live from March 10-13, 2022!
