Not every part of an image has to be absolutely perfect. There are still a lot of lessons to be learned from this slightly less-than-perfect image.
When I proposed the processing of this image for a tutorial one of the comments was, “…there’s also a lot of blur in the foreground which will take a lot of work to clean up if possible. It would be interesting to see how you would overcome these issues.”
As I worked the files, I realized that the blur in the foreground was caused by the strong wind blowing the greenery, which was a part of the story.
The first lesson would be to not rush, as I was, when taken by a scene. I was enamored with the sky, lone tree and canyon. I wanted to frame the scene and did not take into account the blowing wind’s effects. My attention was tuned to obtain a larger file using a double row panorama. Onward to the exposures.
The scene
This Grand Canyon view jumped into my sight as I rounded a corner while heading back to camp. After a long day of travel, hiking and shooting, this sky made me pull over and race to grab my gear. Not having time to get out and set up the panorama head I did the best I could to get the lens close to the nodal point.
Having the Fotopro Eagle E6L tripod with the Quick Level head was a big help. Leveling the camera was a snap and click stops on the head made overlapping frames consistent.
If there is time, I always make multiple passes of the scene. I recommend always photographing from left to right as it shows the images in order in the viewer window after they are downloaded. A handy trick to separate each sequence is to take a dark frame using the lens cap or you hand to cover the lens between each sequence. It can make choosing your panoramic sections a breeze in your viewing software.
Panorama capture
There are a couple of reasons to create a panorama view image. One is esthetic. The panorama format is more the view your eye sees while viewing a landscape. It can be more representative, and at the same time, an artistic vision of a scene.
Another reason is practical. I like the light weight and lower price of the micro four-thirds camera format, but that gives me a smaller sensor with which to work. When I wish for more pixels a panoramic capture is the way to go. I call it the poor man’s large format.


Ideally when making photos for a panorama, you want to overlap each frame by about 30-50 percent. The greater the overlap, the easier it is for your software to blend multiple images to your final output.
You can also make your file even larger by making a second pass with the camera tilted upward. I won’t go into deep detail here but ideally you will want to set up your camera so the lens pivot is over the point where the light enters the lens.
You’ll see when I process this image that extra post processing work has to be done to correct some of the curvature created by mounting the camera a bit forward of the nodal point. A level camera is also important.
Exposure
Sunset shooting can lead to underexposure of your shadow areas. I try to expose to push the sky brightness as far as I can without loosing any color channel information. If your camera has a histogram, make sure it is active and push the information to the right. Shoot in RAW, if possible, for the most file information.
The info shown on your histogram is reflecting the JPEG preview your camera is producing, so you probably have more in-room even when pressed to the edge. Test your camera to learn how far you can go. This is known as ETTR — “Expose to the Right.” Experience has shown I can bring back sky color in post whereas bringing up detail from underexposed areas adds unwanted noise.
Processing
The first stop for me is Adobe Camera Raw. A general correction to bring the files closer to the actual scene is performed; I bring down highlights and open up shadows. Then I tweak overall exposure, color, etc. for one of the files.
Highlight that file and and Shift-click the last file to select all files and Synchronize your settings. Click the Done button instead of opening the individual files. The settings will be applied to the files as they open in the next step.
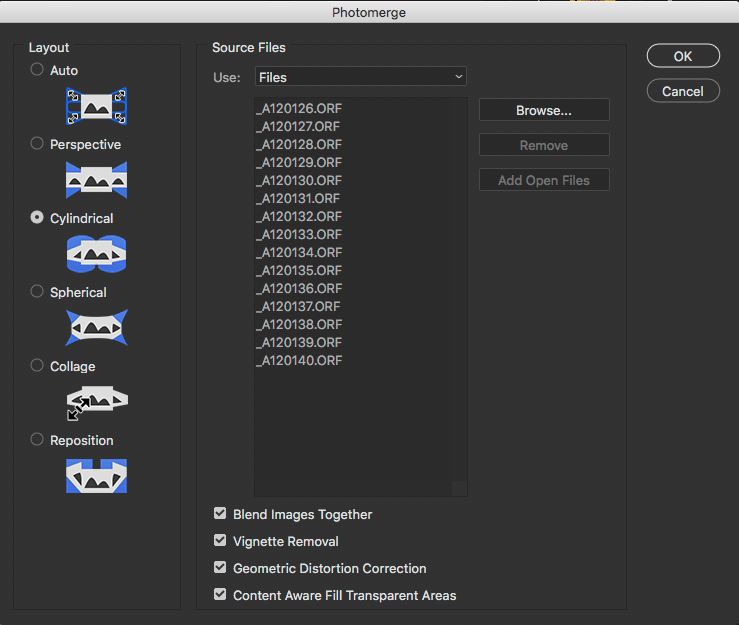
In Adobe Bridge, highlight all files for your panorama including the second row. From the menu bar, select Tools > Photomerge.


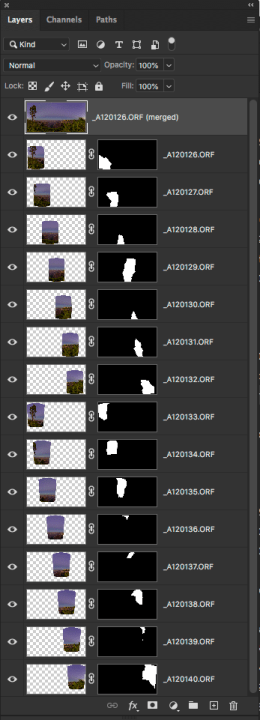
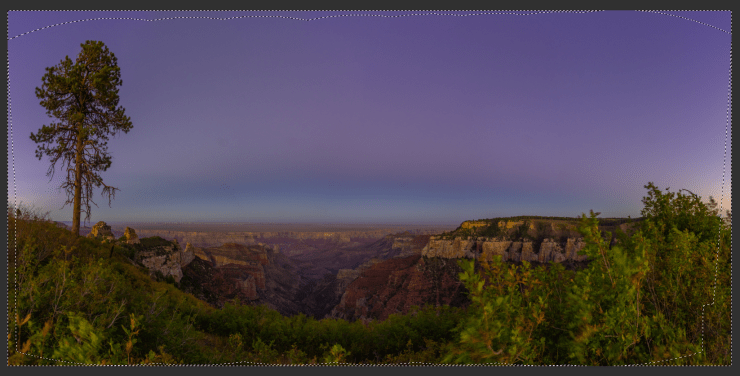
Here’s what the file looks like after processing. Photoshop blends the images together using masks. Before you flatten the image, check along all lines of the mask to make sure the blending doesn’t need any tweaks. Turn on and off layers to check.
You can also turn on or off the mask by shift clicking on the layer. You can just click on the mask to active it again. You can also see the mask in full size by Option/Alt clicking on the mask. Return to regular view with the same Option/Alt clicking on mask again.

Photoshop does a great job of bringing the pieces together. Note the slight curvature of the sky toward the sides of the image. That’s because the light entry point of the lens, AKA nodal point, was not over the pivot point of the tripod.
In part two, I’ll show you how I processed and finished the image with Photoshop.
Yours in Creative Photography, Bob
Tell your story with the second annual Visual Storytelling Conference!
Experience four days of interactive, online training sessions featuring a range of educational content with experienced photographers and content creators. This free event kicks off with a series of technical boot camps to build essential skills, followed by live, online sessions on photography, video, business and social media. Join live from March 10-13, 2022!
